Wednesday, October 9, 2013

Getting more vegetables in our diet!

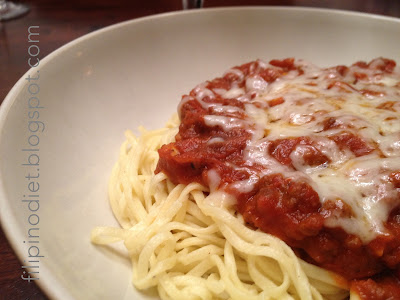
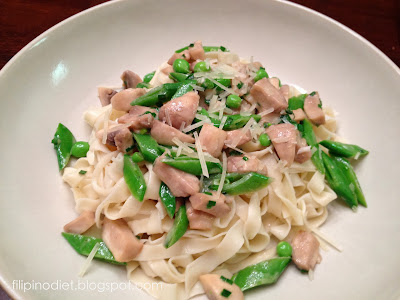
How beautiful does this pasta dish look?  I can attest that it is also rather tasty.

mushroom peas pasta

For us who love their meats + starch meals, it gets to be somewhat challenging trying to think of dishes that incorporates a lot of vegetables - and for the dish to remain tasty.  This is a concoction we came up with one day.

Fettucini with mushrooms and peas

INGREDIENTS

sliced mushrooms, about 1 cup
sliced snap peas, about 1 cup
chopped chives, about 1/2 tablespoon
butter, about 1 tablespoon
grated parmesan cheese, about 1-2 tablespoons
cream, about 1-2 tablespoons
white wine, about 1/4 to 1/2 cup

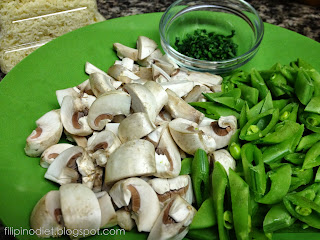
I rarely measure anything when I concoct recipes from my mind.  And for such ingredients as vegetables - it is really difficult to get an accurate measurement anyway.  So, instead of giving you exact measures, I had taken a photo of the initial ingredients, and you can see the ratio of ingredients I had used.  The values above are approximations.  Cooking is more an art than a science, in my opinion.  But this is not my expertise, so don't quote me on that.  :)

mushroom peas pasta


PROCEDURE
  1. I had actually pan fried a chicken breast to give us some extra protein.  So for that, I seasoned the chicken breast with salt, pepper, and paprika.  Heated up a small amount of butter in a pan, and placed the chicken on to brown.  Flip over, and fry until cooked.  
  2. Take off chicken, and place on a paper towel to draw some extra fat from the butter off.
  3. Deglaze frying pan (where you cooked the chicken) with the white wine - should sizzle - and this will help you scrape off the bits that got cooked on the bottom of the pan.  This should not take too long, and the wine will begin evaporating.
  4. If you don't do the chicken step, begin here.
  5. Add the butter on to the pan, with a little bit of the wine still boiling away (if you did steps 1-3).  When butter is melted, add mushrooms, and sautee until liquid starts slightly collecting.  
  6. Add the peas.  Saute for a few minutes, until desired doneness.  (I did this rather quickly, fresh peas impart such wonderful sweet flavor!)
  7. Add cream.  Keep stirring and allow cream to evaporate until only about half remains. 
  8. Add parmesan, and salt and pepper to taste.  Stir a couple of times, then take off the heat.  Serve!
My husband made fresh fettucini, and we served the vegetables on top, and sprinkled lightly with parmesan.  Yummy, and we got our vegetable serving!  


Monday, September 30, 2013

Avgolemono Soup, the easy version

When I'm feeling under the weather, my Filipino heritage really comes out.  When I was growing up, my mom would always make me Sinigang whenever I was sick.  Pretty sure many other Filipinos would relate.  The warm and extra sour soup not only nourishes, it also feels really soothing down one's sore throat.

Today, I am seriously feeling ill, achy muscles and all, and really do not feel like getting in a motor vehicle to pick up some ingredients from the Asian market.  But feeling sick, I still need (1) something to eat, and (2) preferably something sour.

Then a genius idea came to mind:  Avgolemono soup!

lemon soup


For those of you less adventurous, and have never heard nor tried it, it's a Greek lemon soup.  It really is very tasty.

For the Filipinos, it is probably the child of sinigang and arroz caldo.  Okay, that's probably a terrible comparison, but in any case, because the ingredients are more readily available in one's kitchen (and in regular grocery stores nearby), and is fairly quick to make, it really is a good alternative to sinigang.  (It's also good when one is not sick though.)  Oh, and it's healthy too!

This is the easy version, because I cannot be bothered to work in the kitchen to make stock from scratch when I'm not feeling well.


INGREDIENTS

5 cups water
6 tsp Better than Bouillon Chicken Base (or other chicken soup base)
6 tablespoons jasmine rice (or other rice)
3 eggs
fresh lemon juice
ground white pepper (I could't find ours so I used freshly ground black pepper)
salt to taste


PROCEDURE
  1. Boil water in a medium to large saucepan, then add chicken base.
  2. Once dissolved, add rice, stir (so rice doesn't stick to bottom), cover and let simmer for about 18-20 minutes (until rice is cooked).
  3. A couple minutes before timer goes off for the rice, crack the eggs into a medium-sized bowl, and whisk.  Use a whisk that can take heat (metal or silicone - whatever you can use with your type of pot as well).
  4. Once rice is done, gently/slowly add 1-2 cups of the hot stock (try to avoid rice, but it's not detrimental if you get some too) into the egg bowl WHILE WHISKING.  You need to be quite gentle with the addition, and somewhat vigorous with the whisking so that the eggs do not congeal.  Very important, as this can ruin the soup.  
  5. Add lemon juice to the egg bowl (start with 1/3 cup, but I usually start with the juice of one decent-sized lemon because I like it on the sour side), keep whisking.
  6. Then again, very gently, add the egg mixture into the soup pot, again, WHILE WHISKING.  
  7. Add ground pepper, start with about 1/2 tsp, or to taste.
  8. At this point, have a taste of the soup.  IF you want it more sour, add more lemon juice.  I usually make it with about 1 lemon on a regular day, and about 2 lemons when I'm not feeling well.
  9. Let come to a simmer (only a couple minutes or so).  When serving, may want to grind some pepper on top.  (I do like my pepper too though, so add to your taste.)

greek lemon soup

The lighting in our kitchen wasn't very good - it actually has a very slight yellow tinge, not the white soup it appears to be on the photo.  In any case, if you give it a go, I hope you enjoy it!


Wednesday, September 18, 2013

Fresh SPAGHETTI from scratch

I admit, I have never made fresh pasta in my life.  My husband always does it.  My excuse is that I refuse to learn to make it so that he would always have to, ha ha.  He learned the technique while he was unemployed a few years ago, when he quit his job to move countries for mine.  I am quite lucky.

But ever since he started making fresh pasta, we have refused to eat boxed pasta - it just is not nearly as tasty!  (Okay, admittedly, when we have the rare weird urge for Kraft Mac & Cheese, we do have it.)

Apparently, it is not difficult, so here's an easier recipe, if you want to give it a go!


fresh spaghetti


SEMOLINA SPAGHETTI

1.5 cups semolina flour
2 eggs
1 tbsp olive oil
1 tbsp water
pinch of salt

Essentially, throw all these into your Kitchenaid mixer, and with the dough hook, put on high until it forms a ball and no dough remains stuck on the bottom.  It will take a few minutes, and yes, it is a little unnerving putting your Kitchenaid through that much effort.  But we've used ours for this purpose for several years, and it's still working very well.

Once in the ball, wrap dough in saran wrap and leave at room temperature for at least 30 minutes.

Roll out onto sheets, then cut into desired pasta type.  

We use this pasta roller.  We bought it at the same price years ago.  Works very well, and hasn't given us any problems.

Note though, that pasta rolling may need some practice.  My husband normally uses a simpler recipe than this, only consisting of regular unbleached flour and eggs, but the rolling process is slightly trickier than this one.  Also, in our experience, fettucini and linguine are much easier to roll out than spaghetti.  This is the best recipe we've found so far for spaghetti.

It tastes wonderful, especially with homemade tomato sauce (recipe can be found here).  

Enjoy!


Friday, September 13, 2013

Keeping an herb garden

"Healthy" in my books does not only mean "low-calorie".  I think it also means getting away from extra preservatives ever present in convenience foods, and trying to prepare food that are more "natural" in nature (less processed).  Don't get me wrong, my husband and I are not advocates of crazy fad diets... which I probably will blog about in the future.  We do not advocate strict organic eating either (because we still need to learn more about it), nor are we crazy health food nuts.  We are still learning our way.  But one thing we already know for sure, is that we love food.

Healthy eating, for us, involves a lot of home cooking.  This way, we know exactly what went into the dish, and how it was prepared.  We are still in the infancy of learning what flavors go well with what.  What we've already discovered though, is the extra flavor in food delivered by fresh herbs.

herb garden:  thyme and sage


We've tried growing herb gardens before, but have failed.  In Canada, our herbs would begin to grow, but then we would lose them because of it getting too hot too quickly, or spider mites or other bugs would begin to take hold.

But this summer, likely due to my less busy schedule of being in-between jobs, I was finally able to keep some herbs alive around the house!  There were two secrets to this semi-success:  (1) extra water retention, for those days I forget to water them, and (2) for the outdoor ones, beneficial insects.

So, we've successfully grown thyme and sage (photo), which we keep indoors (although by a west-facing window, so you can see how the plants are desperately trying to reach more light), and basil, chives, cilantro, and Italian parsley, which we keep outdoors.  

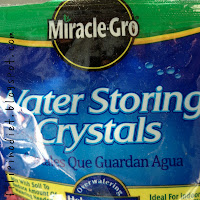
Being in California, where it is so incredibly dry, not being strict about the watering regime proves to be a nightmare for keeping plants.  And when I was working full time, that is how our herbs did not survive.  Just kept forgetting about watering them.  But now, although I still forget every now and then, I have added superabsorbents into the soil before sprinkling the seeds to grow (it's so much cheaper to sow seeds than to have to purchase the plant from a nursery).  This is what I've used, and it worked wonders:

superabsorbents

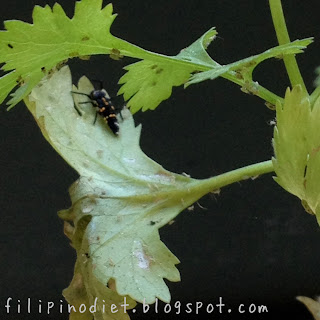
The other thing I've decided to face head on since moving to California, is to attempt to battle the bug infestations on these plants.  And believe me, I have battled.  It is almost a lesson in frustration at times... you win one, and another takes hold.  Recently, my thriving cilantro patch was taken over by aphids.  The plants were getting older, and beginning to bloom, so I wasn't too concerned; I just sowed more seeds elsewhere.  These plants were infested - and it was frustrating to see the aphid population devour the plants that have given us so much flavor over the summer!  So we were planning on purchasing some ladybugs from a local nursery to try to get rid of these bugs - they LOVE to eat aphids.  But one day, I saw a lady bug on the cilantro, eating away.  I hoped that others would follow.  But the next day, it was gone.  Decided then that we must really go and purchase some.  The problem though, is that since it's still rather warm out, we were waiting for cooler evenings and days so that our bugs don't leave quickly, like the one rogue one I saw on the plants (ladybugs are not that cheap to buy).  Today, as I watered them, I decided we have to get ladybugs this weekend because they have already migrated from the cilantro over to the parsley, and proliferating well.  Sigh.  Another battle.  But then, I saw this black bug (note the thriving aphid population!):

herb garden and ladybugs

I was hoping it ate aphids (although I was a little grossed out by its looks), and didn't think anything of it, until I saw a few more.  So I googled this black bug, and found out that it is the larva of a lady bug!  Yay!  Yay for beneficial insects.  Hopefully they're hungry!  

So anyway, onward we trudge towards keeping our herb garden.  It has really elevated the dishes we've been cooking this summer!  I fully recommend planting one, even a small one - with just your favorite herbs.  So much satisfaction - not only from seeing the fruits of your labor, but also in the remarkable flavor you get in your food.

Monday, September 9, 2013

How to make MOZZARELLA CHEESE from scratch

For months, my friend Leanne has been asking how we make our mozzarella cheese from scratch.  My husband and I have actually planned to make our own Instructable at one point to send to her, then life got crazy, and just never got around to it.  Now that things are calming down, and now that I've started a blog, she's reminded me that I still have not given her instructions.  So, Leanne, here it is!  Recipe based off of book Cheese Making by Ricki Carroll.


INGREDIENTS

1.5 tsp citric acid (dissolved in 0.5 cup water)
1 gallon milk (we use whole milk)
0.25 tsp rennet*
1 tsp cheese salt (optional, or to taste)

PROCEDURE

1.  Heat milk in large pot on stovetop.  When milk gets to 55ºF, add citric acid, and stir.  Keep stirring until milk reaches 90ºF.

Mozzarella cheese from scratchMozzarella cheese from scratch

2.  Remove milk from heat, and slowly mix in rennet.  Gently mix in an up and down motion, for about 30 seconds, then place cover and leave alone for about 5 minutes.

Mozzarella cheese from scratchMozzarella cheese from scratch

3.  At this point, milk should have turned into curd and whey.  Cut the curd with the back of a knife (or other thin apparatus) as pictured.  If, when you're cutting, you notice the curd is still too runny, let sit for a few more minutes.  

Mozzarella cheese from scratch

4.  Then put pot back on stove and gently stir while heating to 105ºF.  Once temperature is reached, remove from heat, and keep stirring for 5 minutes.  

Mozzarella cheese from scratch

5.  Scoop out curds (leave whey in pot) onto large microwavable bowl.  (We don't actually know what to use the whey for - we've always just thrown it out.  Any ideas?)  You will need to manipulate the curds in this bowl, so make sure it is large enough that there is enough room to maneuver.

Mozzarella cheese from scratch

6.  Once most of the whey has been removed from the bowl of curds (we use a cheesecloth to squeeze out as much of the whey as possible), put bowl in microwave at high for 1 minute.  Fold/gently knead cheese over and over (see picture).  At this point, we add some of the cheese salt; the folding allows for its distribution.  You don't need to do this step; we prefer it with the salt.  Repeat this microwave/knead procedure at least two more times, each time warming up for only 30 seconds.  We take pinches off it at this time to taste.  If you want more salt, this is the time to add.  

Mozzarella cheese from scratchMozzarella cheese from scratch

7.  At this point, cheese should stretch, like in photo.  If not, keep repeating the half minute microwave heating and folding/kneading.  According to book author, cheese will not stretch until it reaches 145ºF.
Mozzarella cheese from scratch

8.  Once it stretches, form into a smooth ball and cut into slices for serving.  Or, shape into smaller balls.  We normally eat it at this point.  If we store it, we put them in a glass Pyrex dish and cover tightly in the refrigerator.  We're not exactly sure how long it can last because it is always finished by the following day.  So yummy!


Mozzarella cheese from scratch

I hope that helps!  It isn't difficult, and so tasty, it is definitely worth a try!


*There are two types of rennet pictured above.  If you use the tablet form, use a quarter of a tablet, dissolved in 0.25 cool unchlorinated water.


EDIT: 
Leanne was asking where to purchase the items that may not be normally stocked in one's kitchen.  We got the citric acid from a local health food store.  Cheese salt, I've seen at either Whole Foods or Lunardi's, but we purchased ours online before we saw them at the store.  The rennet we also ordered online at:

New England Cheesemaking Supply Company
(413) 628-3808

The book also offers a source in Canada:

Glengarry Cheesemaking & Dairy Supply
(888) 816-0903


Friday, September 6, 2013

TOMATO SAUCE from fresh tomatoes

Years ago, my wonderful mother-in-law, who had kept a large garden, made and canned the best tomato sauce I had ever tasted.  She had done that for a couple of years, and we would get our tomato sauce "supply" every fall.  It was awesome.  Unfortunately, she had gotten sick, and stopped making it.  Time had passed, and I had forgotten just how much better tasting tomato sauce from fresh tomatoes is, compared with commercially-bought ones.

Until last night.  Our tomato plants had been going crazy over the last few weeks, and I decided to use the tomatoes for... something... before they go bad.  So I harvested them and decided (because there were so many) to make my ultimate comfort food:  spaghetti and meat sauce.  

Because of this "healthier lifestyle" that we're attempting to get into, I contemplated cutting the beef with some ground turkey.  I actually had my hand on the ground turkey in the store, when I saw how expensive it is, and thought, "I'm spending this money to get a dish that is not as tasty?!"  So I put it down and walked away.  I was thinking that filling a tasty comfort food with a less tasty meat just to ingest the same volume is simply going to provide less pleasure.  So I decided to make it with only ground beef, but with less beef than normal.  That way, we get the full beef flavor, and fully enjoy the dish.

This is what we had:


Tomato sauce from scratch

It was absolutely awesome.  Well worth it, even if it is not as meaty as we normally make it.

And now the secret to making it tasty:  cooking from scratch.  If you have not done it before, and feel motivated to try it, here's how we did it:


TOMATO SAUCE FROM SCRATCH (using a slow cooker)

I did my usual search for a recipe online, but I just used what I read as a guideline.  I had a lot of smallish tomatoes, and decided to risk not blanching them first, nor de-seeding.  I can't tell you the exact quantities of what I used, but I hope this photo can give you an idea on the ratios:

Tomato sauce from scratch

I used a combination of Roma tomatoes and Stupice type Heirloom tomatoes, garlic from Gilroy (of course), and sweet onion from my husband's colleague's garden.  

I cut up the tomatoes into rough chunks (see picture below).  In a pan, I sweated the onions in olive oil, sprinkled some salt, then followed that with the garlic then a sprinkling of crushed red pepper flakes.  Once aromatic, I added the chunks of tomatoes and heated that until some of the juices were visible in the pan.

Tomato sauce from scratch

Then I scraped all of this onto my slow cooker pot, stirred in 5-6 fresh basil leaves from our garden, a pinch of brown sugar, and put it on high for about 2 hours.  Then sprinkled in a generous amount of dried oregano, stirred, and let that sit for another hour and a half.  I'm sure you can do this on the stovetop; I just like being able to turn the slow cooker on and forget about it.  Stir occasionally, and ensure it's not too dry, or it'll burn.  Then put it all in a blender until the right consistency.

Tomato sauce from scratch

You can then use this as a sauce.  If you taste it, it is a lot creamier and sweeter than commercially bought tomato sauce, without having to add any dairy product.  Use as you would for meat sauce.

If you want guidance for that, this is how we made ours:


MEAT SAUCE

Sautee in olive oil, about 4-5 cloves of garlic, minced (we like our garlic).  Once aromatic (ensure it doesn't burn!), add the ground beef (we used 88:12 protein to fat ratio; from Costco) and some salt and pepper, and let brown.  At one point, oil will begin accumulating on the bottom - I scooped out a lot of this to remove some excess fat.  Must leave some though, to allow the beef to cook well.  Then add the tomato sauce, a pinch of white sugar (the seeds in the tomatoes contribute a slight bitterness, so I added the sugar to sort of counterbalance that), a bay leaf.  Let simmer.  Season to taste (I just added a pinch of salt - the sauce was awesome already).  Scoop on to pasta, and add grated Asiago cheese on top (the saltiness of the Asiago is perfect with this sauce).  Broil until cheese is melted.  Enjoy!!!

Thursday, September 5, 2013

Leftovers for lunch: Ginisang Upo

Since I am currently in between jobs, it's a little easier for me to figure out what to eat, since I am not in a constant hurry to get to a job, etc.  The decision-making process is quite difficult though.  Then there is the aim to not waste.  And so, leftovers are generally what the choices boil down to for my lunches these days.  (Actually, even when I was working, leftovers often ended up being my lunches - they're quick, less work, and so not to waste.)

Today, I was exceptionally hungry (thanks to a really light dinner), and had this for lunch:

upo

What is it?  Good question.  I can tell you that's half a cup of brown rice.  Yes, switched to brown rice for its higher fiber content.  It does not taste as good as white rice, but you get used to it.  The "ulam", or the dish on the right, I presume to be ginisang upo.  HUH?

"Gisa" is a verb in Tagalog (the main language/dialect of the Philippines) that essentially means "to sautee".  It is a common start to most Filipino cooking... usually beginning with garlic and onion, and then whatever else that follows.  "Ginisa" simply the past tense of gisa, and the added "ng" I think is what converts the word to an adjective, describing the following word.  

Upo, in the meantime, is a vegetable.  I think these things in the photo are upo.  

upo

I am a little unsure because I have never cooked with it before.  I know what upo looks like in the store (and these don't look like those).  These were given to us by a colleague of my husband's.  She's Filipino (heard Engineer was married to a Filipino, so she's an instant mom!  I love Filipino moms.  They spoil ya!  And I haven't even met her yet!), and she grew these in her garden.  In fact, the onions in the background are also from her garden!  The dish I had for lunch, was actually also made by her... this is why I'm not entirely sure what it is.  But it is tasty, for sure!  And from the ratio of vegetables to meat, I am assuming the dish is healthy as well.

If you know what these things are, could you please verify my guesses?

In any case, I think my lunch choice was good today.  Satisfied with both quantity and quality.